|
|

|
Processed through Paypal No account required. |
Buy our over-priced crap to help pay the bills.


|
|
|
Processed through Paypal No account required. |
| Files | ||||
| File Name | Rating | Downloads | ||
| GPU Shark II v2.4.0.0 GPU Shark II v2.4.0.0 A GPU/graphics card information and monitoring utility for Windows. It can monitor the main hardware sensors (temperatures, usages, clock speeds, power) of the graphics hardware (GPU, VRAM) and offers an overview of the 3D APIs support level (OpenGL and Vulkan). GPU Shark 2 is made with GeeXLab. The 64-bit version of GPU Shark 2 can monitor all modern GPUs (NVIDIA GeForce, AMD Radeon, Intel Arc and Moore Threads MTT S80/S70) while the 32-bit version is limited to GeForce and Radeon GPUs only. Intel UHD Graphics 770 + Arc A750 NVIDIA GeForce RTX 2070 + GeForce GT 1030 Changes: v2.4.0.0 - 2024.09.30 - added support of Intel Arc 140V iGPU (Lunar Lake) - added new theme colors. - added About panel - added GL_SHADING_LANGUAGE_VERSION in the OpenGL panel. - improved monitoring of Intel integrated GPUs: added support of GPU usage and power sensors. - improved monitoring of Intel Arc GPUs. - added VRAM temperature for Arc GPUs. - updated with GeeXLab 0.60.2 libs. - various small bug fixes. This download is for the Windows 64bit installer version (very bottom of page). All other download assets are below: Use 7-Zip to unzip this file. No installer: gpushark2_2.4.0.0_win64.7z gpushark2_2.4.0.0_win32.7z Click here to visit the author's website. |
 |
721 | Oct 10, 2024 Ozone3D 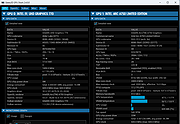 |
|
| Migration Assistant v2.4.0.0 Migration Assistant v2.4.0.0 Move your data from a Windows PC to a Mac Windows Migration Assistant transfers your contacts, calendars, email accounts, and more from your PC to the appropriate places on your Mac. Get ready Make sure that Windows is up to date. Migration Assistant works with Windows 7 or later. Make sure that you know the name and password of an administrator account on your PC. Connect your Mac and PC to the same network, such as your home Wi-Fi network. Or connect an Ethernet cable between the ports on your Mac and PC to create a direct network connection. Some Mac models require an Ethernet adapter. Use Migration Assistant You're now ready to use Migration Assistant to move your files from your PC to your Mac. On your PC 1) Download and install the appropriate Windows Migration Assistant, based on the version of macOS on your Mac. 2) Quit any open Windows apps. 3) Open Windows Migration Assistant, then click Continue. 4) If Windows updates are configured to install automatically on your PC, you might see a message recommending that you turn off automatic installation of Windows updates. When you're ready to proceed, click Continue. 5) When Migration Assistant says that it's waiting for your Mac to connect, complete the next steps on your Mac. On your Mac 1) Open Migration Assistant, which is in the Utilities folder of your Applications folder. 2) Follow the onscreen prompts until you're asked how you want to transfer your information. Select the option to transfer from a Windows PC, then click Continue. 3) Select the icon representing your PC, then click Continue. On your PC Make sure that your PC and Mac ... |
|
3,172 | Nov 03, 2021 Apple Inc. 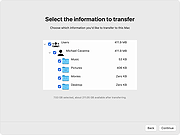 |
|
| Showing rows 1 to 2 of 2 | Showing Page 1 of 1 | 1 |
OlderGeeks.com Copyright (c) 2026
