|
|

|
Processed through Paypal No account required. |
Buy our over-priced crap to help pay the bills.


|
|
|
Processed through Paypal No account required. |
| Files | ||||
| File Name | Rating | Downloads | ||
| BootPerformanceView v1.00 BootPerformanceView v1.00 A free tool for Windows that displays the performance information of the boot process on your system. The information is taken from the Microsoft-Windows-Diagnostics-Performance/Operational event log. For every boot performance record, the following information is displayed: Boot Start Time, Boot End Time, Boot Time, Main Path Boot Time, Kernel Init Time, Driver Init Time, Devices Init Time, Smss Init Time, User Profile Processing Time, and more... You can view the boot performance information on your local system, on remote network computer, or load it from external event log file. Supported operating systems: Windows Vista through Windows 11. Both 32-bit and 64-bit systems are supported. Features: BootPerformanceView doesn't require any installation process or additional DLL files. In order to start using it, simply run the executable file - BootPerformanceView.exe After running BootPerformanceView, the main window displays the boot performance information of the current running system. If you want to view the boot performance information of another system, go to File -> Choose Data Source (or simply press F7), and then choose the desired data source (External events folder or remote computer). License This utility is released as freeware. You are allowed to freely distribute this utility via CD-ROM, DVD, Internet, or in any other way, as long as you don't charge anything for this and you don't sell it or distribute it as a part of commercial product. If you distribute this utility, you must include all files in the distribution package, without any modification. Disclaimer The software is provided "AS IS" without any warranty, either expressed or implied, including, but not limited to, the implied warranties of merchantability and fitness for a particular purpose. The author will not be liable for any special, incidental, consequential or indirect damages due to loss of data or any other reason. Feedback If you have any problem, suggestion, comment, or you ... |
 |
531 | Jun 03, 2025 Nir Sofer 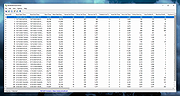 |
|
| DHCPLogView v1.00 DHCPLogView v1.00 Free tool that monitors DHCP requests sent by devices on your network and displays the info. For every device that connects your network the following information is displayed: DHCP Request Time, MAC Address, MAC Address Company, Requested IP Address, Host Name, Vendor Class ID, User Class, PRL Bytes (Parameter Request List), and the operating system of the device (For common versions of Windows and Android) System Requirements Windows XP through Windows 11 Start Using DHCPLogView DHCPLogView doesn't require any installation process or additional DLL files. In order to start using it, simply run the executable file - DHCPLogView.exe Be aware that when you run this tool in the first time, the firewall of Windows operating system will display a warning and you need to allow this tool to access your network. In order to verify that DHCPLogView actually works, you should simply connect one of your devices to your network. If the device is already connected, you have to disconnect it and then connect it again. You should immediately see a new line of the connected device in the main window of DHCPLogView. While DHCPLogView is running you can use the following options: • Turn on the 'Put Icon On Tray' option, close the main window, and allow DHCPLogView to collect information about devices connected to your network. • Turn on also the 'Notification On DHCP Request' option in order to get notification every time that a device is connected to your network. • Select one or more devices, copy the devices list to the clipboard (Ctrl+C) and then paste them to Excel or any other application. • Use the 'Save All Items' option (Shift+Ctrl+S) to export the displayed devices to csv/tab-delimited/xml/html5/JSON file. You can also use the ... |
|
709 | Feb 25, 2025 Nir Sofer 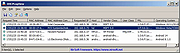 |
|
| Emmabuntus Debian Edition 4 v1.00 Emmabuntus Debian Edition 4 v1.00 Distribution for refurbished computers and GNU/Linux discovery for all Emmabuntus is a desktop GNU/Linux distribution based on Debian Stable on XFCE, made specifically for refurbished computers destined for humanitarian organisations, and to promote the discovery of GNU/Linux by beginners, as well as to extend the lifespan of hardware and to reduce over consumption and waste in electronics. It strives to be beginner-friendly and reasonably light on resources so that it can be used on older computers. It also includes many modern features, such as a large number of pre-configured programs for everyday use, dockbar for launching applications, easy installation of non-free software and media codecs, and quick setup through automated scripts. The Emmabuntus refurbishing key allows you to recondition all kinds of computer by directly cloning a system pre-configured by Emmabuntus. Instructions here. Tutorials for Emmabuntüs Debian Edition 4: https://emmabuntus.org/tutoriels/ Environment Debian 11 " Bullseye " under XFCE : A variant of Debian, taking the same basic concepts, being lighter than the version under GNOME , being able to be installed on quite old computers, and with poor performance hardware. LXQt : Complementary environment included in this version to extend the possibilities of machine reconditioning. Cairo-Dock : Animated application launch bar (or dock , like Mac OS X ) making all the software described below accessible on the desktop. In this version the dock is available in the following 8 languages: English (En) French (Fr) Spanish (Es) Arabic (Ar) German (De) Italian (It) Portuguese (Pt) Danish (Da) The Software Browsers Firefox-ESR : Mozilla Firefox ESR Falkon ... |
|
3,028 | Aug 06, 2024 Emmabuntus 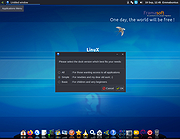 |
|
| FreeSpaceLogView v1.00 FreeSpaceLogView v1.00 A tool for Windows 10 that displays a log of free disk space on your system. This tool only works for NTFS formatted disks. For every log item, the following information is displayed: Log Time, Volume Name, Volume Guid, Lowest Free Space, Highest Free Space, Is Boot Volume (Yes/No). The free space log information is taken from the following event log channel: Microsoft-Windows-Ntfs/Operational FreeSpaceLogView allows you to get the disk free space information from your local computer, from remote computer on your network, and from external hard drive plugged to your computer. System Requirements This tool works only on Windows 10. Both 32-bit and 64-bit systems are supported. This tool doesn't work on older versions of Windows, because the operating system doesn't record the free disk space information in the event log of Windows. Start Using FreeSpaceLogView FreeSpaceLogView doesn't require any installation process or additional DLL files. In order to start using it, simply run the executable file - FreeSpaceLogView.exe After running FreeSpaceLogView, the main window displays the log of free disk space on your local system. If you want to view the information from remote computer on your network or from external hard drive, open the 'Choose Data Source' window (F7), and choose the desired data source to load. Command-Line Options /stext <Filename> Save the free space log records to a simple text file. /stab <Filename> Save the free space log records to a tab-delimited text file. /scomma <Filename> Save the free space log records to a comma-delimited text file (csv). /shtml <Filename> Save the free space log records to HTML5 file (Horizontal). /sverhtml <Filename> Save the free space log records to HTML5 file (Vertical). /sxml <Filename> Save the free space log records to XML file. /sjson <Filename> Save the free space log records to JSON file. Translating FreeSpaceLogView to other languages In order to translate FreeSpaceLogView to other ... |
|
3,043 | Oct 21, 2021 Nir Sofer 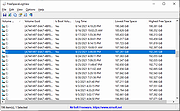 |
|
| FullUpdatesHistoryView v1.00 FullUpdatesHistoryView v1.00 A simple, free tool for Windows 11 that displays the history of Windows updates on your system. For every Windows update history record, the following information is displayed: Update Time, Title, Description, Information URL, Category, KB Number, Update ID, Provider ID, and more... System Requirements The FullUpdatesHistoryView tool uses a new database available only on Windows 11 ( C:\ProgramData\USOPrivate\UpdateStore\store.db ), so you cannot use it for previous versions of Windows. For viewing the Windows updates history on older versions of Windows you can use this tool: Windows Updates History Viewer. FullUpdatesHistoryView vs Previous Tool The previous tool for viewing the Windows updates history (Windows Updates History Viewer) reads the updates by using Windows API or by reading the database file directly from C:\Windows\SoftwareDistribution\DataStore\DataStore.edb, depending on what you choose in the 'Advanced Options' window. However, every time that a major update of Windows 11 is installed (e.g: 23H2, 24H2), all previous updates are deleted from the database by Windows operating system, so the previous tool cannot display the updates installed on your system before the last major update of Windows. Windows 11 has a new updates history database on C:\ProgramData\USOPrivate\UpdateStore\store.db which keeps all updates history records. So the FullUpdatesHistoryView uses this database to show you the full updates history information. Start Using FullUpdatesHistoryView FullUpdatesHistoryView doesn't require any installation process or additional DLL files. In order to start using it, simply run the executable file - FullUpdatesHistoryView.exe After running FullUpdatesHistoryView, it automatically loads the Windows updates history from the local database ( C:\ProgramData\USOPrivate\UpdateStore\store.db ) and displays all records in the main window. If you want to watch the Windows updates history from another system, open the 'Advanced Options' window (F9), choose the 'Load Windows updates history from external database file' option and then type the desired database file. If you want to filter some types of Windows ... |
|
708 | Mar 20, 2025 Nir Sofer 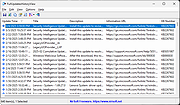 |
|
| IPPathTableView v1.00 IPPathTableView v1.00 A tool for Windows 11/10/8/7/Vista that displays the IP path table of your local computer. For every IP path entry, the following information is displayed: Source, Destination, Next Hop, MTU, Reachaable (Yes/No), Adapter Name, Connection Name, Link Transmit Speed, Link Receive Speed. The IP path table contains the list of all IP Addresses that your computer connected recently System Requirements This tool works on any version of Windows, starting from Windows Vista and up to Windows 11. Both 32-bit and 64-bit systems are supported. Start Using IPPathTableView IPPathTableView doesn't require any installation process or additional DLL files. In order to start using it, simply run the executable file - IPPathTableView.exe Afer running IPPathTableView, the main window displays the current IP path table of your system. You can press F5 to refresh the display of IP path table, or you can automatically refresh the display every 1 - 10 seconds by using the Auto Refresh option (Under the Options menu). You can select one or more items (or press Ctrl+A to select all of them) and then use the 'Save Selected Items' option (Ctrl+S) to export the table to comma-delimited/tab-delimited/HTML/XML/JSON file. Command-Line Options /stext <Filename> Save the IP path table to a simple text file. /stab <Filename> Save the IP path table to a tab-delimited text file. /scomma <Filename> Save the IP path table to a comma-delimited text file (csv). /shtml <Filename> Save the IP path table to HTML5 file (Horizontal). /sverhtml <Filename> Save the IP path table to HTML5 file (Vertical). /sxml <Filename> Save the IP path table to XML file. /sjson <Filename> Save the IP path table to JSON file. Translating IPPathTableView to other languages In order to translate IPPathTableView to other language, follow the instructions below: 1) Run IPPathTableView with /savelangfile parameter: IPPathTableView.exe /savelangfile A file named IPPathTableView_lng.ini will be created ... |
|
2,420 | Feb 06, 2024 Nir Sofer 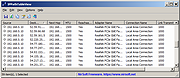 |
|
| KeyboardStateView v1.00 KeyboardStateView v1.00 KeyboardStateView is a simple tool for Windows that displays the current state and virtual key code of every key you press. It also allows you to view the current state of all keyboard keys. For every key, the following information is displayed: Key Name (VK_XXXX ), Description, Key Code (Decimal), Key Code (Hexadecimal), Key Pressed Status, Key Toggled Status (Useful for Num Lock, Caps Lock), and last time that the key was pressed. Start Using KeyboardStateView KeyboardStateView doesn't require any installation process or additional DLL files. In order to start using it, simply run the executable file - KeyboardStateView.exe After running KeyboardStateView, every key that you press on your keyboard is displayed on the main window of KeyboardStateView, even when KeyboardStateView is not in focus. If you want to view the state of all keys, simply turn off the 'Show Only Keys Pressed In Last seconds' option (Under the Options menu) Translating KeyboardStateView to other languages In order to translate KeyboardStateView to other language, follow the instructions below: Run KeyboardStateView with /savelangfile parameter: KeyboardStateView.exe /savelangfile A file named KeyboardStateView_lng.ini will be created in the folder of KeyboardStateView utility. Open the created language file in Notepad or in any other text editor. Translate all string entries to the desired language. Optionally, you can also add your name and/or a link to your Web site. (TranslatorName and TranslatorURL values) If you add this information, it'll be used in the 'About' window. After you finish the translation, Run KeyboardStateView, and all translated strings will be loaded from the language file. If you want to run KeyboardStateView without the translation, simply rename the language file, or move it to another folder. License This utility is released as ... |
|
4,170 | Jul 02, 2020 Nir Sofer 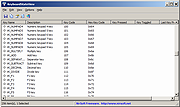 |
|
| MadPassExt v1.00 MadPassExt v1.00 MadPassExt (Microsoft Account DPAPI Password Extractor) This tool allows you to decrypt and extract the secret DPAPI password generated for your Microsoft account when using it to log into Windows 10 or Windows 11. After you retrieve this DPAPI password, you can use it to recover passwords encrypted with DPAPI from external hard drive, as long as they were encrypted with the same Microsoft account. Example for NirSoft tools that allows you to recover passwords and data from external drive with the password you extract with this tool: ChromeCookiesView - For extracting cookies of Chrome Web browser stored on external drive. ChromePass - For recovering passwords of Chrome Web browser stored on external drive. CredentialsFileView - For decrypting Windows Credentials passwords and data stored on external drive. VaultPasswordView - For decrypting Windows Vault passwords and data stored on external drive. System Requirements You can use this tool on any version of Windows, as long as you know the login password of your Microsoft account, and you have read access to the cache file of your Microsoft account (Usually located under the following folder - C:\Windows\System32\config\systemprofile\AppData\Local\Microsoft\Windows\CloudAPCache\MicrosoftAccount ) Be aware that this cache file is generated only after you login with your Microsoft account on Windows 10 or Windows 11. How to use MadPassExt MadPassExt doesn't require any installation process or additional DLL files. In order to start using it, simply run the executable file - MadPassExt.exe After running MadPassExt.exe, the main window is displayed, and you have to type the password of your Microsoft account. Optionally, you can also type the filename or folder of your Microsoft account cache file. You can find it in the following path: C:\Windows\System32\config\systemprofile\AppData\Local\Microsoft\Windows\CloudAPCache\MicrosoftAccount\[Account ID]\Cache\CacheData If you don't fill this field, MadPassExt will find the cache file of your ... |
|
3,394 | Jan 03, 2022 Nir Sofer 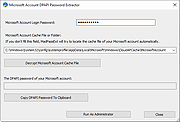 |
|
| My IP v1.00 My IP v1.00 My IP reads the public IP of your internet connection and reports it in the systray area. My IP can also send an alert email when the IP changes. What's new in 1.00: - first release |
|
6,440 | Apr 09, 2016 My Portable Software 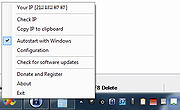 |
|
| OutlookAccountsView v1.00 OutlookAccountsView v1.00 A password recovery tool for Windows that displays the details of all POP3/IMAP/SMTP accounts stored in your Outlook profiles. For every account, the following information is displayed: Account Name, Display Name, Email, User Name, Password, Profile Name, Server Address, Server Type, Server Port, Registry Key, Windows User, and PST files used for this account. You can extract the Outlook accounts information of the current user, from external disk plugged to your computer, and from remote computer on your network. System Requirements This tool works on any version of Windows, starting from Windows XP and up to Windows 11. Both 32-bit and 64-bit systems are supported. This tool works with any version of Microsoft Outlook, starting from Outlook 2007 and up to Outlook 2019. In order to recover the mail passwords from external disk or remote computer, you have to provide your login password. Start Using OutlookAccountsView OutlookAccountsView doesn't require any installation process or additional DLL files. In order to start using it, simply run the executable file - OutlookAccountsView.exe After running OutlookAccountsView.exe, the 'Advanced Options' window is opened, and then you can choose to load the Outlook accounts list from your current user, from remote system, or from external hard drive. If you choose to load the Outlook accounts list from external drive or remote computers, you have the fill more fields in order to decrypt the mail passwords. After choosing the desired option, click the 'OK' button, and OutlookAccountsView will displays your Outlook accounts in the main window. You can select one or more mail accounts (or press Ctrl+A to select all) and then export the list to comma-delimited/tab-delimited/HTML/XML/JSON file by using the 'Save Selected Items' option (Ctrl+S). You can also copy the accounts list to the clipboard (Ctrl+C) and then paste them to Excel or other application. Recover Outlook accounts from external disk If you ... |
|
2,834 | Feb 09, 2022 Nir Sofer 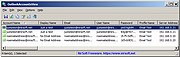 |
|
| RuntimeClassesView v1.00 RuntimeClassesView v1.00 A tool for Windows 10 and Windows 11 that displays the list of Windows Runtime (WinRT) classes installed on your system. For every Runtime class, the following information is displayed: Class Name, Filename, Threading, Trust Level, Server, Activation Type, Registry Key, Bitness, Key Modified Time, CLSID, and file version information. When selecting a Windows Runtime class in the upper pane, this tool tries to get the list of interfaces implemented by the selected class and the list is displayed in the lower pane. System Requirements This tool works on Windows 10 and Windows 11. Both 32-bit and 64-bit systems are supported. This tool is just a small standalone .exe file that you can run on any system without installing anything. Start Using RuntimeClassesView RuntimeClassesView doesn't require any installation process or additional DLL files. In order to start using it, simply run the executable file - RuntimeClassesView.exe After running RuntimeClassesView, the main window displays the list of all runtime classes installed on your system. If you want to find a specific runtime class, you can press Ctrl+Q, and then in the quick filter window, type the string you want to find. When you select a single runtime class in the upper pane of the main window, RuntimeClassesView tries to get the list of interfaces implemented by the selected class (By calling the IInspectable::GetIids method ) and the list is displayed in the lower pane. You can also select one or more runtime classes (or select all of them by pressing Ctrl+A) and then export them to tab-delimited/comma-delimited/HTML/XML/JSON file by using the 'Save Selected Items' option. Command-Line Options /stext <Filename> Save the runtime classes list to a simple text file. /stab <Filename> Save the runtime classes list to a tab-delimited text file. /scomma <Filename> Save the runtime classes list to a comma-delimited text file ... |
|
2,505 | Jul 27, 2022 Nir Sofer 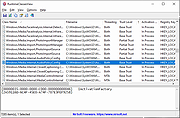 |
|
| SecurityQuestionsView v1.00 SecurityQuestionsView v1.00 A free tool for Windows 10 that allows you to view the security questions and their answers stored in the Registry by the Windows 10 operating system. SecurityQuestionsView can decrypt the security questions stored on your current running system (Requires elevation) and it can also decrypt the security questions stored on external hard drive. SecurityQuestionsView displays the security questions of all users on your system that chose to set their security questions, for every user there are usually 3 questions. System Requirements This tool works on Windows 10/11, both 32-bit and 64-bit systems. For extracting the security questions from external drive, you can run this tool on earlier versions of Windows (Windows 7, Windows Vista). Start Using SecurityQuestionsView SecurityQuestionsView doesn't require any installation process or additional DLL files. In order to start using it, simply run the executable file - SecurityQuestionsView.exe After running SecurityQuestionsView, you have to choose how to load the security questions - From your local system or from external drive. If you choose to load the security questions from your local system, SecurityQuestionsView will ask you to run this tool as Administrator (Elevation), because only Administrator can access and decrypt the security questions. If you choose to load the security questions from external drive, you have to type the folder where the Registry files are located, for example: K:\windows\system32\config The Registry hive needed to extract the security questions is SAM. After the security questions and their answers are displayed on the main window of SecurityQuestionsView, you can select the questions (Ctrl+A) and then export them to comma-delimited/tab-delimited/XML/HTML file by using the 'Save Selected Items' option (Ctrl+S). Translating SecurityQuestionsView to other languages In order to translate SecurityQuestionsView to other language, follow the instructions below: Run SecurityQuestionsView with /savelangfile parameter: SecurityQuestionsView.exe /savelangfile A file named SecurityQuestionsView_lng.ini will be created ... |
|
2,915 | Jan 02, 2023 Nir Sofer 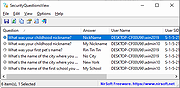 |
|
| ShutdownPerformanceView v1.00 ShutdownPerformanceView v1.00 A free tool for Windows that displays the performance information of Windows shutdown process. The information is taken from the Microsoft-Windows-Diagnostics-Performance/Operational event log. For every Windows shutdown performance record, the following information is displayed: Shutdown Start Time, Shutdown End Time, Shutdown Time, User Session Time, User Profiles Time, Services Time, and more... You can view the shutdown performance information on your local system, on remote computer on your network, or load it from external event log file. Supported operating systems: Windows Vista through Windows 11. Both 32-bit and 64-bit systems are supported. Start Using ShutdownPerformanceView: ShutdownPerformanceView doesn't require any installation process or additional DLL files. In order to start using it, simply run the executable file - ShutdownPerformanceView.exe After running ShutdownPerformanceView, the main window displays the shutdown performance information of the current running system. If you want to view the shutdown performance information of another system, go to File -> Choose Data Source (or simply press F7), and then choose the desired data source (External events folder or remote computer). License This utility is released as freeware. You are allowed to freely distribute this utility via CD-ROM, DVD, Internet, or in any other way, as long as you don't charge anything for this and you don't sell it or distribute it as a part of commercial product. If you distribute this utility, you must include all files in the distribution package, without any modification. Disclaimer The software is provided "AS IS" without any warranty, either expressed or implied, including, but not limited to, the implied warranties of merchantability and fitness for a particular purpose. The author will not be liable for any special, incidental, consequential or indirect damages due to loss of data or any other reason. Feedback If you have any problem, suggestion, comment, or you found a bug in this utility, you can send ... |
|
504 | Jun 03, 2025 Nir Sofer 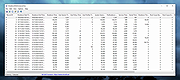 |
|
| Sleep v1.00 Sleep v1.00 Sleep is a very simple command that will allow you to put a delay in your batch files. Specify the amount of milliseconds as a parameter and Sleep will wait for that period of time. Extremely useful in batch file programming. Usage: Sleep <number of milliseconds> Example Run: C:\>sleep 1000 C:\> Click here to visit the author's website. |
|
5,767 | Aug 28, 2019 CyLog Software 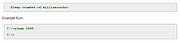 |
|
| SNRemove v1.00 SNRemove v1.00 When a dll or exe file is signed with strong name keys, .NET doesn't allow you to modify it. If you try to use a signed assembly, after you have made some changes with Hex editor or any other tool, you'll get the following exception: An unhandled exception of type 'System.IO.FileLoadException' occurred in system.windows.forms.dll Additional information: Strong name validation failed for assembly 'MyAssembly.Test'. If you try to run a signed executable file after you have made some changes in it, you'll get the following error message: String name validation failed for assembly... The file may have been tampered with or it was partially signed but not fully signed with the correct private key. This utility removes the reference to strong name signature from .NET exe and dll files. After removing the strong name reference, you can make any change you want in dll/exe file, without getting any exception or error message. However, be aware that assemblies with no strong name reference cannot be added into the Global Assembly Cache (GAC). Using SNRemove Using SNRemove is very simple - just extract the snremove.exe to any folder you like, and run it from Command Prompt with the desired command-line parameters. SNRemove Usage SNRemove [options] <filename> Options: -r Remove the reference to Strong Name signature from the specified file. -d Display the Strong Name signature of the specified file. The <filename> parameter may also contain wildcards. Examples: SNRemove -r c:\myfiles\dll1.dll SNRemove -d "c:\my files\*.dll" System Requirements Although this utility is designed to work with exe and dll files created for .NET environment, the utility by itself wasn't written in .NET, which means that it can work in all versions of Windows, even if .NET Framework is not installed. License This utility is released as freeware. You are allowed to freely distribute this utility via floppy disk, CD-ROM, Internet, or in any other way, as long as you ... |
 |
9,685 | Jul 09, 2019 Nir Sofer 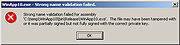 |
|
| WinMailPassRec v1.00 WinMailPassRec v1.00 A password recovery tool for Windows 10 and Windows 11 that displays the details of all POP3/IMAP/SMTP/Exchange accounts stored in the mail application of Windows operating system. For every account, the following information is displayed: Account Name, Email, Mailbox Type, Mail Server, User, Password, Outgoing Server, Outgoing Server Password, Account Creation Time, Last Used Time, Last Sync Attempt Time, Last Sync Success Time. System Requirements This tool works with the built-in mail application of Windows 10 and Windows 11. Both 32-bit and 64-bit systems are supported. You can also use this tool on older versions of Windows (like Windows 7) for recovering data from external disk with Windows 10 or Windows 11. Be aware that WinMailPassRec can only recover the passwords of POP3/IMAP/SMTP/Exchange accounts. It cannot recover the passwords for other types of accounts like Microsoft account or Gmail. General Information The mail App of Windows 10 and Windows 11 stores the POP3/IMAP/SMTP/Exchange accounts information in 2 different places: Under the following Registry key: HKEY_CURRENT_USER\Software\Microsoft\ActiveSync\Partners (Every account on different subkey) - Most of the account information is stored under this Registry key, but without the server and password information. The passwords and server information are encrypted and stored inside Windows Vault (Located under the following folder: %LocalAppData%\Microsoft\Vault\4BF4C442-9B8A-41A0-B380-DD4A704DDB28 ) WinMailPassRec combines the information from the above 2 places. Start Using WinMailPassRec WinMailPassRec doesn't require any installation process or additional DLL files. In order to start using it, simply run the executable file - WinMailPassRec.exe After running WinMailPassRec, the 'Advanced Options' window is opened, and then you can choose to load the Windows Mail accounts from your current user, or from external hard drive plugged to your computer. If you choose to load the Windows Mail accounts from external disk, you have to fill more fields in order to decrypt the mail passwords. After ... |
|
2,810 | Mar 08, 2022 Nir Sofer 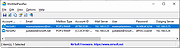 |
|
| Showing rows 1 to 16 of 16 | Showing Page 1 of 1 | 1 |
OlderGeeks.com Copyright (c) 2026
