|
|
|
Processed through Paypal No account required. |
Buy our over-priced crap to help pay the bills.


|
|
|
Processed through Paypal No account required. |
| File - Download Clipshare v3.3.1/v3.3.0 | ||||||||
| Description | ||||||||
|
A plea... Deanna and I have been running this site since 2008 and lately we're seeing a big increase in users (and cost) but a decline in percentage of users who donate. Our ad-free and junkware-free download site only works if everyone chips in to offset the revenue that ads on other sites bring in. Please donate at the bottom of the page. Every little bit helps. Thank you so much. Sincerely, your Older Geeks: Randy and Deanna Always scroll to the bottom of the page for the main download link. We don't believe in fake/misleading download buttons and tricks. The link is always in the same place. Clipshare v2.8.0/v2.10.1 Free program to share your Clipboard between your Android device and Windows, Linux or macOS. Totally portable. Totally on demand. ClipShare is a lightweight, cross-platform app for sharing copied text, files, and screenshots between an Android mobile and a desktop. 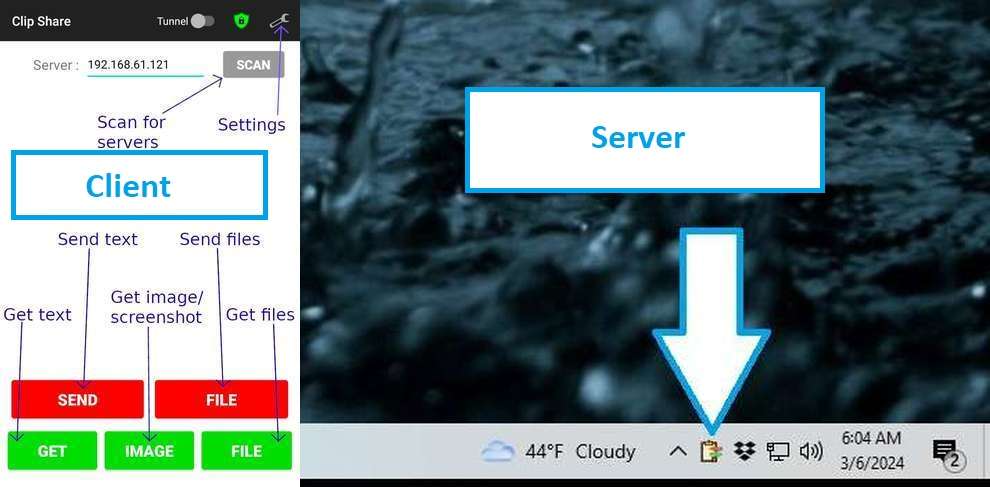 How to use Android client 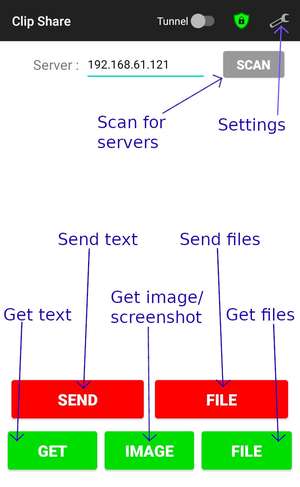 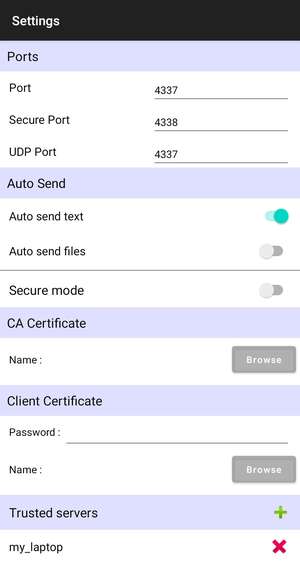 • Get text: To get copied text from the server (ex: laptop) to the phone. Steps: Copy any text on the laptop. Press the green colored GET button. Now, the copied text is received and copied to the phone. Paste it anywhere on the phone (possibly in a different app). • Send text: To send copied text from the phone to the server (ex: laptop). Steps: Copy any text on the phone (possibly in a different app). Press the red colored SEND button. Now, the copied text is sent and copied to the laptop. Paste it anywhere on the laptop. • Get files: To get copied files from the server (ex: laptop) to the phone. Steps: Copy any file(s) and/or folder(s) on the laptop. Press the green colored FILE button. The copied files and folders are now received and saved on the phone. • Send files: To send files from the phone to the server (ex: laptop). Method 1 Steps: Press the red colored FILE button. Select the file(s) to send The files are now sent to the laptop. Method 2 Steps: Share any file(s) with ClipShare from any other app. Press the red colored FILE button. The files are now sent to the laptop. • Get image/screenshot: To get a copied image or screenshot from the server (ex: laptop) to the phone. Steps: Optional: Copy an image (not an image file) to the clipboard on the laptop. Press the green colored IMAGE button. If there is an image copied on the laptop, it will be received and saved on the phone. Otherwise, a screenshot of the laptop will be received and saved on the phone. • Scan: To scan the network to find available servers in the network. If there is any server in the network, scanning will find that. If the scan finds only one server, its address will be placed in the Server address input area. If the scan finds many servers, a popup will appear to select any server out of them, and the selected address will be placed in the Server address input area. How to use server  • Install dependencies Note: This section is required only on macOS. ClipShare needs the following libraries to run, libunistring libssl libpng These libraries can be installed using Homebrew with the following command: brew install libunistring openssl@3 libpng Run the server • You can run the server from a terminal or the GUI (if the file manager supports executing programs by double-clicking on it) • On macOS, if you run the server from the GUI (by double-clicking it on Finder), it may open a terminal window. But you can close this window. The server will continue running in the background. • When the server starts, it will not display any visible window. Instead, it will run in the background. • On Linux or macOS, if you start the program from the terminal, it should return immediately (the server will continue to run in the background). • On Windows, it will show a tray icon unless disabled from the configuration file. You can click on it to stop the server. • If something goes wrong, it will create a server_err.log file. That file will contain what went wrong. Allow through firewall 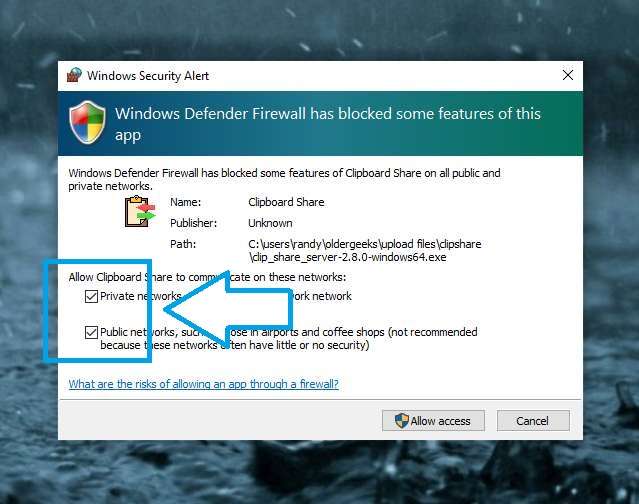 This server listens on the following ports (unless different ports are assigned from the configuration), • 4337 / TCP - For application traffic (not encrypted) • 4337 / UDP - For network scanning. This is for UDP broadcasts • 4338 / TCP - For application traffic over TLS (encrypted) • 4339 / TCP - For the web server (if the web server is available) You may need to allow incoming connections to the above ports for the client to connect to the server. Note that all TCP ports are for unicast, while 4337/udp is used to receive broadcast. Therefore, the firewall rule that allows 4337/udp should have the broadcast address of the interface as the destination address. Connect the client application • The client and the server devices should be on the same network. You can do that by connecting both devices to the same Wi-Fi network. It is also possible to use one of the devices as a Wi-Fi hotspot and connect the other device to that hotspot. • If the client supports network scanning, it can easily find the server in the network. Otherwise, enter the server's IPv4 address to the client. • Now the client can share clipboard data and files and get images from the server. • Note that the server should allow the client through the firewall, as mentioned in the above section. Create SSL/TLS certificate and key files Note: This section is optional if you do not need the TLS encrypted mode and the web mode. The following files should be created, and their paths should be specified in the configuration file clipshare.conf. You may use different file names and paths to store the keys and certificates. • server.key - SSL/TLS key file for the server • server.crt - SSL/TLS certificate file of the server • ca.crt - SSL/TLS certificate of the CA, which signed both the server.crt and the client's SSL/TLS certificate You may use the helper script keygen.sh in the helper_tools/ directory to generate TLS keys and certificates for both the server and the client. Keep the clipshare.ext file in the same directory as the keygen.sh script when running the script. # If you download/clone the repository and run the script from the repository root, chmod +x helper_tools/keygen.sh helper_tools/keygen.sh # If you download the script separately and run the script from within the same directory, chmod +x keygen.sh ./keygen.sh If you use this script, the server's common name will be clipshare_server, and the client's common name will be clipshare_client. You may change those names in the keygen.sh script. Refer to the OpenSSL manual for more information on generating keys. Command line options ./clip_share [-h] [-s] [-r] [-R] -h Help - Display usage and exit. This takes priority over all other options. -s Stop - Stop all instances of the server if any. This takes priority over -r and -R. -r Restart - Stop other instances of the server if any, and restart the server. This option takes precedence over the restart value in the configuration file. -R No-Restart - Start the server without restarting. This option takes precedence over the restart value in the configuration file. Configuration Create a file named clipshare.conf and add the following lines into that configuration file. app_port=4337 app_port_secure=4338 udp_port=4337 web_port=4339 insecure_mode_enabled=true secure_mode_enabled=true web_mode_enabled=false server_key=cert_keys/server.key server_cert=cert_keys/server.crt ca_cert=cert_keys/ca.crt allowed_clients=allowed_clients.txt working_dir=./path/to/work_dir bind_address=0.0.0.0 restart=true max_text_length=4194304 max_file_size=68719476736 # Windows and macOS only display=1 # Windows only tray_icon=true • Note that all the lines in the configuration file are optional. You may omit some lines if they need to get their default values. 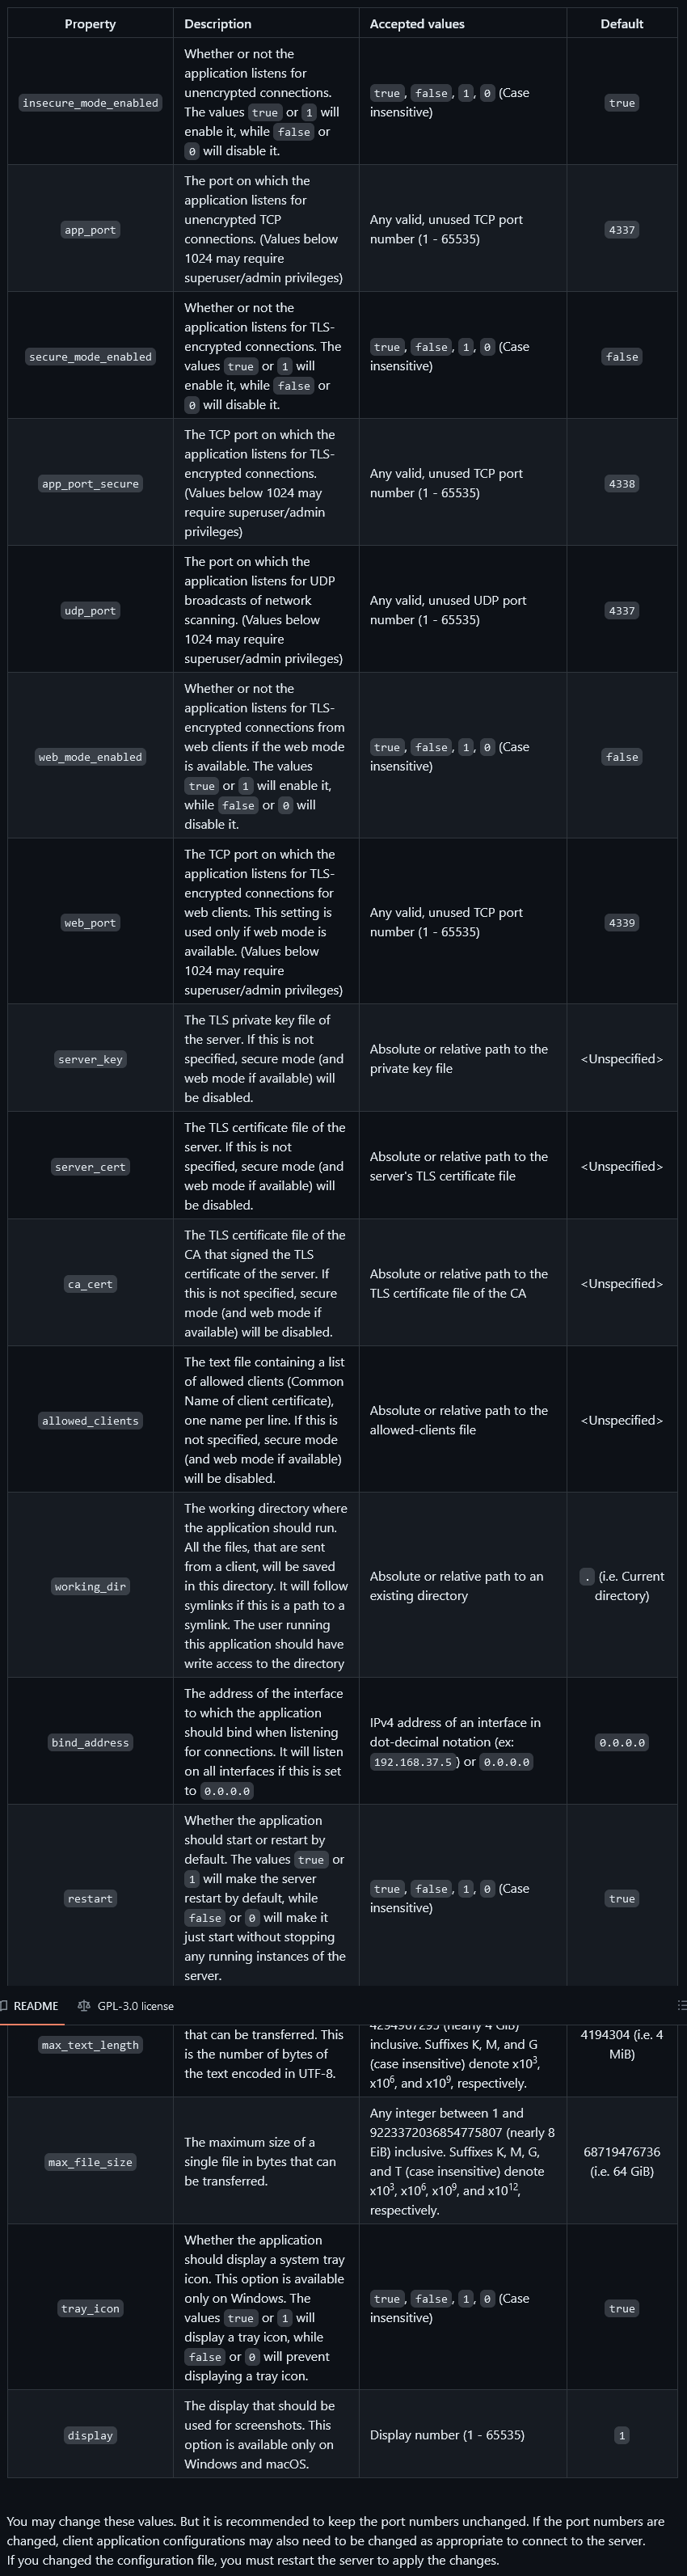 Changes: Bug fixes Fix possible failure when sending large files above 2 GiB Fix possible memory leak Add online installers to release assets Fix possible compilation issues on some platforms This download is for the Windows Server version. All other download assets are below: macOS Server: clip_share_server-3.3.1-macos.zip Linux Server: clip_share_server-3.3.1-linux_x86_64.tar.gz Android Client: clip_share_client.apk See: How to install third-party apps without the Google Play Store Click here to visit the author's website. Continue below for the main download link. |
||||||||
| Downloads | Views | Developer | Last Update | Version | Size | Type | Rank | |
| 1,157 | 7,838 | thevindu-w | Sep 13, 2024 - 12:16 | 2.8.0/2.10.1 | 2.57MB | ZIP |  , out of 50 Votes. , out of 50 Votes. |
|
| File Tags | ||||||||
| Clipshare v2.8.0/v2.10.1 | ||||||||
Click to Rate File Share it on Twitter → Tweet
|