|
|

|
Processed through Paypal No account required. |
Buy our over-priced crap to help pay the bills.


|
|
|
Processed through Paypal No account required. |
| File - Download Quick Any2Ico v3.5.0.0 | ||||||||
| Description | ||||||||
|
A plea... Deanna and I have been running this site since 2008 and lately we're seeing a big increase in users (and cost) but a decline in percentage of users who donate. Our ad-free and junkware-free download site only works if everyone chips in to offset the revenue that ads on other sites bring in. Please donate at the bottom of the page. Every little bit helps. Thank you so much. Sincerely, your Older Geeks: Randy and Deanna Always scroll to the bottom of the page for the main download link. We don't believe in fake/misleading download buttons and tricks. The link is always in the same place. Quick Any2Ico v3.5.0.0 A free portable application that creates high quality icon files from any file, folder or resource. It can also add or remove image formats from icon files, save the extracted icons in the PNG format and much more. 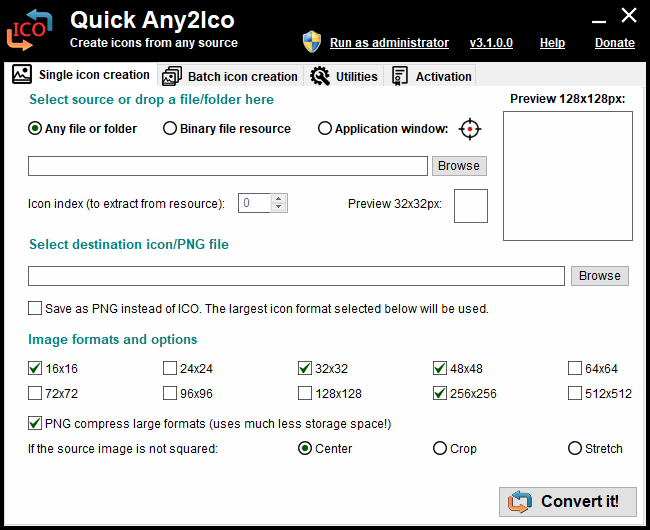 Selecting the source file • In order to choose the source file, you need to select the conversion mode. Quick Any2Ico supports two modes: Convert from any file or folder, and Extract from binary file resource. • If you want to convert a picture to an icon or extract the icon associated with a file object (a file folder, for instance) use the former, which is selected by default. If you want to extract the icon from the resource of a binary file, such an executable file, a DLL, an animated cursor, or an existing icon file, select Extract from binary file resource. • The easiest way to select the source file is to drag it to the input box in the Select source group. Using this method, Quick Any2Ico will automatically select the conversion mode based on the dropped file. • You can also press the browse button, in the Select source group. The behaviour of this button will depend on the selected conversion mode. • If Convert from any file or folder is selected, it will open the shell's browse for file dialog, allowing you to browse to the folder containing the image you want to convert, select the desired file and open it. • If Extract from binary file resource is selected, it will open the pick icon dialog, allowing you to select an icon from the resource of the file. The Icon index input specifies the zero based index of the icon within the binary resource. • Note: If you want to extract the icon associated with a file folder, you will need to drag it to the input box, or manually enter its path, because using the Browse button will not allow you to select folders. Selecting the destination file • If you selected the source file by drag and drop, The destination file input will be automatically set wilth the same path and file name as the source file, but with an ICO or PNG file extension, depending on whether Save as PNG instead of ICO is checked or not. • You can set the destination file by either dragging a file to the input box, pressing the Browse button, in the same group, or manually entering the path of the ICO/PNG file to be created. • Quick Any2Ico allows you to save the file in the PNG format instead of the ICO format. This can be useful, for instance to extract an icon from an executable file or a DLL and save it in the PNG format. • If you wish to save in the PNG file format, check Save as PNG instead of ICO. Selecting the embedded image formats • Icon files can have more than one image embedded. • Quick Any2Ico allows you to create icons with up to 10 image formats: 16x16, 24x24, 32x32, 48x48, 64x64, 72x72, 96x96, 128x128, 256x256 and 512x512. Each format defines the width and height of the image, in pixels. • Select the checkboxes corresponding to the formats you want to embed in your icon. You need to select at least one format. • If you are saving as PNG instead of ICO, you only need to select one format. In this case, if you select several formats, the largest selected format will be used. Enabling the PNG compression • Starting with Windows Vista, the images contained in icon files can have png compression. In order to keep compatibility with Windows xp, Quick Any2Ico only compresses large formats: 128x128, 256x256 and 512x512. • Even if your icon files are destined to Windows xp, you can PNG compress these formats. It will not affect the ability of Windows to display your icons. • PNG compressed icon files use much less disk space. While a 256x256 uncompressed icon uses 300 KB of HDD space, the same icon will normally use less than 100 KB if it is PNG compressed. The image quality will be fully preserved. • If you do not want to use PNG compression, uncheck PNG compress large formats. • This option has no effect if you're saving the icon as a PNG file instead of ICO. Selecting the image adjustment options • The images contained in icon files are normally squared. • When converting from an image file (jpg, bmp, png, gif, tiff, etc), and the source image is not squared (i.e the width is greater than the height), you can modify the way Quick Any2Ico saves the picture inside the icon's square. • By default, the picture will be centered inside the square. If you want it to be cropped to fill the whole square, select the Crop radio button. Otherwise, if you want it to be stretched to to fill the square, select the Stretch radio button. Saving the file • After selecting the source and destination files, and the desired options and formats, you're ready to create your ICO or PNG file. • To do so, just press the Convert it! button. The text of this button may also be Extract it!, if Extract from binary file resource is selected. • The result of the conversion/extraction will be displayed in a text label just below this button. • Note: If the destination file is the same as the source, a backup file is created in the same path. The naming method for the backup file is <original name> (backup). • Quick Any2Ico can extract the icon associated with any file system object, such as a file folder, a shortcut or pdf document! • Try dragging it to the Quick Any2Ico's icon! Changes v3.5 Improved the UI with a gradient title bar and rounded corners Bug fixes. 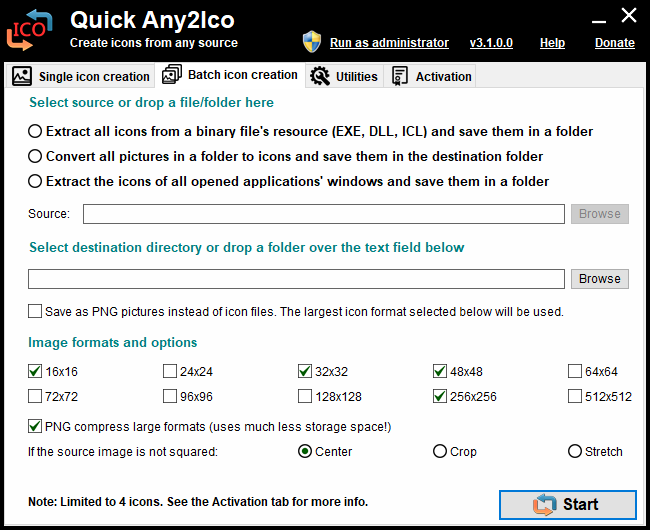  Click here to visit the author's website. Continue below for the main download link. |
||||||||
| Downloads | Views | Developer | Last Update | Version | Size | Type | Rank | |
| 6,079 | 13,520 | Carifred | Dec 29, 2024 - 12:16 | 3.5.0.0 | 615.4KB | EXE |  , out of 93 Votes. , out of 93 Votes. |
|
| File Tags | ||||||||
| Quick Any2Ico v3.5.0.0 | ||||||||
Click to Rate File Share it on Twitter → Tweet
|