|
Backup Assist v3.5
Backup Assist v3.5
Easily backup your data to an external hard drive.
Simply select the items you wish to backup, choose your destination, and the tool does the rest.
It also features an Advanced mode where you can add custom locations to your backup, choose to automatically shutdown your computer when the backup is complete, and for advanced users the ability to change the backup type.
You can also backup to a network location (mapped drive) but need to follow instructions here first:
Backing up to a mapped network location rather than an external drive
Although this tool was primarily created to allow you to easily backup to an external hard drive, you can also use it to backup to a network location (mapped drive) but you do need to follow the steps below to be able to do this - if not you will see the following error in your backup logs. This is because the underlying code performing the backup requires administrative access to the destination location and mapping a drive normally in Windows File Explorer alone doesn't give it the required permissions.
Error Path: Z:\Example_Mapped_Drive_Path\Backup
Error Code: (0x00000003)
Error Description: The system cannot find the path specified.
For these instructions we are mapping drive Z: to a location called \\TESTPC\BackupFolder as an example.
1) Disconnect the existing mapped drive in File Explorer e.g. right click on it and choose Disconnect
2) Open Windows PowerShell as administrator - the quickest way is to right click on the Start Menu and choose Windows PowerShell (Admin) or Terminal (Admin)
3) Type the following command and press return (changing the drive letter and path to your desired driver letter and location):
NET USE Z: \\TESTPC\BackupFolder /PERSISTENT:YES
4) Now map the drive in File Explorer as you normally would
5) You can now use Backup Assist to backup to this network location
Changes:
09/06/23 v3.5
Added load / ... |
 |
2,194 |
Aug 16, 2023
PC Assist Software 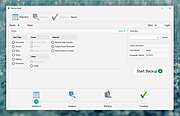 |