|
|

|
Processed through Paypal No account required. |
Buy our over-priced crap to help pay the bills.


|
|
|
Processed through Paypal No account required. |
| Files | ||||
| File Name | Rating | Downloads | ||
| FolderIcons v1.27 FolderIcons v1.27 FolderIcons is an MS Windows customizing tool, that helps you change the icons of your file system's folders. It works by simply adding a desktop.ini file in a folder, then changes the folder's attributes, as described in Microsoft's Customizing Folders with Desktop.ini MSDN article. FolderIcons automates this process making it very easy to change your folders' iconds, revert them back to original, recursively asign the same icon to a whole folder tree, etc. Compatible with icons in DLLs, EXEs, ICLs and literaly any file that contains icons. Click here to visit the author's website. |
 |
5,997 | Aug 23, 2019 CyLog Software 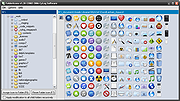 |
|
| ImageCacheViewer v1.27 ImageCacheViewer v1.27 A simple tool that scans the cache of your Web browser (Internet Explorer, Firefox, or Chrome), and lists the images displayed in the Web sites that you recently visited. System Requirements And Limitations This utility works in any version of Windows, starting from Windows XP and up to Windows 10. Both 32-bit and 64-bit systems are supported. The following Web browsers are supported: Internet Explorer, Mozilla Firefox, SeaMonkey, and Google Chrome. ImageCacheViewer won't work if you configure your Web browser to clear the cache after closing it. It's recommended to close all windows of your Web browser before using ImageCacheViewer, to ensure that all cache files are saved to the disk. Start Using ImageCacheViewer ImageCacheViewer doesn't require any installation process or additional DLL files. In order to start using it, simply run the executable file - ImageCacheViewer.exe After running ImageCacheViewer, it begins to scan the cache of your Web browser, and displays all cached images from Web sites you visited in the last day. If you want to get images from other days, you can remove or change the last 1-day filter from the 'Advanced Options' window (F9). After the scanning process is finished, you can also watch the image in the lower pane of ImageCacheViewer, by selecting the desired item in the upper pane. If from some reason ImageCacheViewer fails to detect the cache of your Web browser properly, you can go to 'Advanced Options' window (F9), and choose the desired cache folders to scan for each Web browser. Command-Line Options /stext <Filename> Save the cached images list into a simple text file. /stab <Filename> Save the cached images list into a tab-delimited text file. /scomma <Filename> Save the cached images list into a comma-delimited text file (csv). /stabular <Filename> Save the cached ... |
|
5,664 | Jan 18, 2022 Nir Sofer  |
|
| Showing rows 1 to 2 of 2 | Showing Page 1 of 1 | 1 |
OlderGeeks.com Copyright (c) 2026
