|
|

|
Processed through Paypal No account required. |
Buy our over-priced crap to help pay the bills.


|
|
|
Processed through Paypal No account required. |
| Files | ||||
| File Name | Rating | Downloads | ||
| CredentialsFileView v1.12 CredentialsFileView v1.12 A free, simple tool for Windows that decrypts and displays the passwords and other data stored inside Credentials files of Windows. You can use it to decrypt the Credentials data of your currently running system, as well as the Credentials data stored on external hard drive. System Requirements This utility works on any version of Windows, starting from Windows XP and up to Windows 11. Both 32-bit and 64-bit systems are supported. Changes Version 1.12: Fixed a problem with decrypting Credentials files from external drive on Windows 11 22H2. Updated to save/load the folders information. Fixed to display the password column properly when the password string is Ascii instead of Unicode. Updated to work properly in high DPI mode. Data Stored In Credentials Files Windows operating system stores the following information inside Credentials files: Login passwords of remote computers on your LAN. Passwords of mail accounts on exchange server (stored by Microsoft Outlook) Windows Live session information. Remote Desktop 6 user\password information. Internet Explorer 7.x and 8.x: passwords of password-protected Web sites ("Basic Authentication" or "Digest Access Authentication") Password of MSN Messenger / Windows Messenger accounts Credentials File Location You can find the Credentials files of Windows in the following locations: C:\Users\[User Profile]\AppData\Roaming\Microsoft\Credentials (Windows Vista and later) C:\Users\[User Profile]\AppData\Local\Microsoft\Credentials (Windows Vista and later) C:\Windows\system32\config\systemprofile\AppData\Local\Microsoft\Credentials (Windows 8 and later) C:\Documents and Settings\[User Profile]\Application Data\Microsoft\Credentials (Windows XP) C:\Documents and Settings\[User Profile]\Local Settings\Application Data\Microsoft\Credentials (Windows XP) Start Using CredentialsFileView CredentialsFileView doesn't require any installation process or additional DLL files. In order to start using it, simply run the executable file - ... |
 |
7,211 | Dec 06, 2023 Nir Sofer 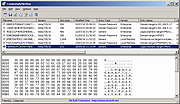 |
|
| CyberShredder v1.12 CyberShredder v1.12 CyberShredder is a quick, safe and handy utility that lets you erase confidential files from your computer permanently. Normal file deletion will remove a file's directory entry and allocation table information. The actual disk clusters that contained the file's data remains intact on your hard disk and can be recovered later. CyberShredder overwrites the space occupied from a file with random data and erases the file, so an unerase utility will never be able to recover it. CyberShredder's simple interface will help you get rid of confidential data permanently. It deletes files using three different shredding methods, including the NSA approved seven-pass file deletion method. Please note that files and directories erased by CyberShredder can not be recovered using an undelete program. Make sure you use it with care. We recommend that you learn how to use the program by testing its behaviour with some test data first. Version 1.12: Quicker abort, abandons operation even at the end of a file operation File operation progress gauge, shows progress of each file operation (pass) Renames file multiple (26) times, not just once Remembers form position Click here to visit the author's website. |
|
5,097 | Mar 02, 2019 CyLog Software 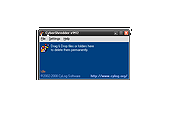 |
|
| OfflineRegistryFinder v1.12 OfflineRegistryFinder v1.12 Free tool to scan and search Windows Registry hives in external drives. Find the desired Registry keys/values/data according to the search criteria you define. After OfflineRegistryFinder displays the search result, you can easily select one or more items and then export them into a .reg file that can be used to import in the RegEdit tool of Windows. OfflineRegistryFinder can also be used for Registry scan of your running operating system. You simply have to create a Registry snapshot, and then scan this snapshot with OfflineRegistryFinder. Searching in a Registry snapshot is usually much faster then searching in the Registry of running system. Supported operating systems: Windows XP through Windows 11. Changes: v1.12: Fixed a few high DPI mode issues. Added 'Black Background' option (Under the View menu). When it's turned on, the main table is displayed in black background and white text, instead of default system colors. Start Using OfflineRegistryFinder: This utility doesn't require any installation process or additional DLL files. In order to start using it, simply run the executable file - OfflineRegistryFinder.exe After running it, the 'Registry Search Options' window is displayed. You have to type the folders that contain the Registry files you want to scan (You can type up to 3 different folders), You can also choose a drive letter or shadow copy path in the top combo-box and then click the 'Automatic Fill' button to automatically detect and fill the correct paths of the Registry Files. choose the desired search criteria, and then click the ok button to start the search. After the search is finished, you can select one or more items and then generate a .reg file from them by using the 'Copy As .reg File' option (Ctrl+R) or the 'Export Selected Items To .reg File' option (Ctrl+E) Search in the ... |
|
5,729 | May 13, 2025 Nir Sofer 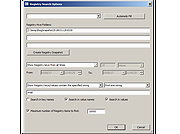 |
|
| VaultPasswordView v1.12 VaultPasswordView v1.12 A simple tool for Windows 11/10/8/7 that decrypts and displays the passwords and other data stored inside 'Windows Vault'. You can use it to decrypt the Windows Vault data of your currently running system, as well as the Windows Vault data stored on external hard drive. Changes Version 1.12: Fixed a problem with decrypting Windows Vault passwords from external drive on Windows 11 22H2. Updated to work properly in high DPI mode. System Requirements • This utility works on any version of Windows, starting from Windows 7 and up to Windows 11. Both 32-bit and 64-bit systems are supported. Be aware that this tool is not very useful on Windows 7, simply because Microsoft started to use the Windows vault for storing IE and Windows mail passwords only from Windows 8. vYou can also use this tool on Windows XP with SP3 for decrypting the Windows Vault of external drive with Windows 11/10/8/7. Passwords And Data Stored by Windows Vault • Passwords of Internet Explorer 10.0/11.0 and Microsoft Edge running under Windows 8 or later. (Be aware that IE10/IE11 under Windows 7 doesn't use the Windows Vault to store passwords). • Login Information of Windows Mail application (Windows 8 or later). Windows Vault Location Windows vault files are stored in the following folders: C:\Users\[User Profile]\AppData\Local\Microsoft\Vault C:\ProgramData\Microsoft\Vault C:\Windows\system32\config\systemprofile\AppData\Local\Microsoft\Vault Inside these vault folders, there is Policy.vpol filename that contains the encryption key. The encryption key is used to decrypt the .vcrd files in the same vault folder. Notice For Windows 7 Users The term 'Windows Vault' is somewhat confusing because the passwords displayed by Windows 7 as Windows Vault are actually stored inside ... |
|
6,641 | Dec 20, 2023 Nir Sofer 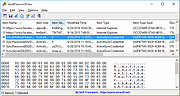 |
|
| Showing rows 1 to 4 of 4 | Showing Page 1 of 1 | 1 |
OlderGeeks.com Copyright (c) 2026
