|
|

|
Processed through Paypal No account required. |
Buy our over-priced crap to help pay the bills.


|
|
|
Processed through Paypal No account required. |
| File - Download On-screen Ruler v2.4.0.167 | ||||||||
| Description | ||||||||
|
A plea... Deanna and I have been running this site since 2008 and lately we're seeing a big increase in users (and cost) but a decline in percentage of users who donate. Our ad-free and junkware-free download site only works if everyone chips in to offset the revenue that ads on other sites bring in. Please donate at the bottom of the page. Every little bit helps. Thank you so much. Sincerely, your Older Geeks: Randy and Deanna Always scroll to the bottom of the page for the main download link. We don't believe in fake/misleading download buttons and tricks. The link is always in the same place. On-screen Ruler v2.4.0.167 A lightweight, free, semi-transparent ruler for the desktop.  Align The on-screen ruler allows precise alignment relative to what you are trying to measure. Alignment is possible in two ways: Gross alignment by dragging the ruler with the mouse, and fine alignment using the keyboard. To move the ruler using the mouse, simply left-click away from the edges, drag the ruler to where you need it and release the left mouse button. Fine Control To position the ruler to pixel-level accuracy (nudge), use the arrow keys. The movement is intuitive; the left arrow key moves the ruler 1 pixel to the left, the right arrow key moves the ruler 1 pixel to the right, the up arrow key moves the ruler 1 pixel up and the down arrow key moves the ruler 1 pixel down. Holding an arrow key down moves the ruler 1 pixel at a time in the direction of the arrow until the key is released. The ruler will extend past the screen boundaries, so make sure not to move it off screen. If you do, use Home to restore it to the screen centre (assuming the ruler is the active window). Tip: use Home or Ctrl + Home to re-centre the ruler if you accidentally move it off screen. Gross Control To move the ruler in larger increments (bump), use Shift + Up, Shift + Left, Shift + Down or Shift + Right Arrow keys. These key combinations move the ruler 20 pixels at a time. Pinning To align the ruler at the screen boundaries, use Ctrl + Up, Ctrl + Left, Ctrl + Down or Ctrl + Right Arrow keys. Centering To re-centre the ruler, use either the Home key or the Ctrl + Home key combination. The Home key does not change the width of the ruler. The Ctrl + Home key extends the ruler across the width of the screen. Calibrate On rare occasions, the pixels per inch reported by the OS is incorrect. In such cases, the Calibrate Tab allows you to adjust the pixels per inch value manually. The programme will remember the value the next time it starts. Use the arrow keys to manually change the markings on the ruler. Horizontal arrows are enabled when the ruler is horizontal and vertical arrows are enabled when the ruler is vertical. You may reset the pixels per inch setting at any time by clicking the reset button near the arrows. Check out the tutorial here. Notes 1) Since the percent and pixel units are not dependent on pixels per inch, calibration cannot be performed while these units are active. 2) If you are in Centimetres or Picas while calibrating, you may occasionally observe uneven tick spacing caused by a rounding artefact. This is because conversion from inches to centimetres involves division by 2.54, which leads to ticks getting rounded down. The other units are not affected by this. Exit The programme can be closed using any one of the following ways: by hitting the Esc key (make sure the ruler is the active window) by middle-clicking on the ruler by middle-clicking on the icon in the system tray by right-clicking on the ruler tab in the Windows task bar and choose Close. by the Alt + F4 key combination (not recommended: make sure the ruler is the active window) Tip: When using Alt + F4, ensure that the ruler is the active window or you may end up closing the active window and losing your work. Learn to use the Esc key instead. In all cases, the on-screen ruler saves the current state before exiting, so it looks the same when you restart the programme. If multiple rulers are active, the last ruler's settings are saved on exit. Tip: The Esc key can also close the Options Dialogue Box Measure There are different ways of using the ruler to measure length. Using the Mouse Size the ruler so the left edge of the ruler is over the feature you wish to measure. Position the mouse over the ruler at the other end of the feature you wish to measure. The marker will move with the mouse and you can read the measurement in the current units on the left of the ruler. Alternatively, you can double-click to set the edges of the ruler over the feature you wish to measure. The first time you double-click, the left edge of the ruler moves to the double-clicked location. The second double-click moves the right edge of the ruler to the double-clicked location. Using the Keyboard Position the ruler so the left edge is aligned with the left edge of the object you want to measure. Resize the ruler using the resize keyboard shortcuts until the right edge of the ruler is aligned with the right edge of the object you want to measure. Resize Using the Mouse To resize the ruler, hover the mouse over the edge of the ruler that you want to resize. The cursor changes to to indicate that the ruler can be resized. You may resize both the height and the width simultaneously if you resize using the corners of the ruler. Click with the left mouse button and drag in either direction to size the ruler. Release the left mouse button when the ruler is the appropriate size. The height of a horizontal ruler and the width of a vertical ruler can be increased only up to a point. Note that the font automatically increases as the ruler height (for a horizontal ruler) or ruler width (for a vertical ruler) increases. Using the Keyboard The ruler can be resized using the keyboard using the '>' and '<' keys. Every time one of these keys is pressed, the ruler increases or decreases in size by 1 pixel. To resize the ruler in larger increments, use the Alt + > or the Alt + < key combination. This increases or decreases the ruler size by 20. Colours When working with images, it is important to be able to set the colours of the ruler so that they are clearly visible. The programme offers users the option of setting the following colours: Background colour Border colour Tick colour Font colour (allows additional options) To set colours, you must first bring up the Options Dialogue Box. You do this by right-clicking anywhere on the ruler or using the Ctrl + O key combination. The colours may be set using the radio-buttons in the Colours group box on the left of the dialogue. Click the option you want to set, say "Background colour". A colour dialogue appears, with the current background colour selected. Pick the new background colour and click OK to close the colour dialogue box. Click OK to close the Options Dialogue Box. Follow the same procedure to set any of the other colours. Font You may change all font properties for the ruler (not the dialog boxes) using the Options dialogue box. Bring up the Options dialogue box by right clicking on the ruler and choosing the Options menu option or by using the Ctrl + O key combination. Look for the Colours groupbox in the Appearance tab and click the button labeled Font. A standard Font Dialogue Box appears, which allows you to change the font for the ruler. These settings are saved when the ruler is closed. The following properties of the font can be changed: Font Name (Verdana, Times New Roman, etc., ...) Font Style (Bold, Italic, Underline, Strikethrough, or combinations thereof) Font Colour (restricted list of colours provided by Windows) Note: The changes only apply to the ruler itself, not the Options Dialogue or the Font Dialogue. Languages An enthusiastic user community has translated the programme into multiple languages. So far, the following languages are supported: Bulgarian (see note) Dutch English French German Malay Spanish Note: Bulgarian (or other Cyrillic languages) and English use different code pages. If you are unable to see Bulgarian text when you choose this option, it is because your system code page is not Cyrillic. To see Bulgarian text, go to the Control Panel, and run the "Regional and Language Options" applet. Choose the following options: Languages Tab: Check "Install files for complex script..." Advanced Tab: Choose Bulgarian under "Select the language to match the language version of the non-Unicode programs you wish to use" You will need to restart your computer for this to take effect. Marker The marker is a line that follows the cursor as it moves over the ruler. The colour of this marker is always complementary to the background chosen, so it is always visible against the background. It can be turned off by using the Marker Visible check box on the Options Dialogue. Alternatively, the marker can be toggled using the F7 key, which acts as a toggle. Orientation The ruler can have one of two orientations: Horizontal Vertical You may set the orientation via the Options Dialogue Box, which can be brought up by right-clicking anywhere on the ruler and choosing "Options" or using the Ctrl + O key combination. The orientation can be set using the radio-buttons in the Orientation group box on the middle right part of the dialogue. Click the option you want to set, say "Horizontal". The ruler should change its orientation to horizontal (assuming it was vertical when you did this). Click OK or Esc to close the Options Dialogue Box. You may also set the orientation without using the Options Dialogue box by using the F2 Function key. The key acts as a toggle, so pressing it twice returns you to the original orientation. You may spawn additional rulers (which initially have an opposite orientation) using Ctrl + N. The rulers are independent of each other (moving one will not move the other). The characteristics of the last ruler closed are saved when they are closed. Snap The ruler can be made to snap to screen edges using the F6 key as a toggle or bringing up the Options Dialogue and checking the Snap to Screen Edge option. The bottom and right edges of the ruler will thicken, to show that the Snap to Screen Edges option has been enabled. To make the ruler snap to a screen edge, simply drag it within 10 pixels of the edge with this option enabled and the ruler will snap to it. The ruler dimensions will not change as a result of this. Nudging (moving the ruler 1 pixel at a time using the arrow keys) will be partially impaired after the ruler has snapped to an edge until it is moved more than 10 pixels away from that edge by a method such as dragging. Stay on top At times, you want the ruler to stay on top of the items you are measuring. In such cases, use the Stay on top toggle feature, which can be accessed by bringing up the Options Dialogue Box using the Ctrl + O key combination or via the context menu. Alternatively, the Stay on Top feature can be toggled via the F5 key. When Stay on top is active, the border becomes thicker to indicate the option is active. Transparency When working with images, it is helpful to turn on transparency to see what you are measuring. The on-screen ruler allows a wide range of transparency, from completely opaque through almost completely transparent. To set the transparency, you must first bring up the Options Dialogue Box. You do this by right-clicking anywhere on the ruler. It is preferable that you stay away from the edges of the ruler when you right-click. The transparency may be set using the slider in the Options Dialogue Box. Drag the slider until the ruler has the desired transparency. Click OK to close the Options Dialogue Box. To set the transparency using keyboard shortcuts, use the PgUp and PgDn Keys. PgUp makes the ruler more transparent, while PdDn makes it less transparent. Using Ctrl + PgUp sets the ruler to maximum transparency, while Ctrl + PgDn makes the ruler totally opaque. The skeletonize mode makes the background completely disappear, leaving anything that is not the background colour (eg: the font, the border and the ticks) visible. You can toggle the skeletonize mode using the F4 key. Tip: do not set the font, ticks or border to the background colour if you want to see them in skeletonize mode. Units Currently, five units of measurement are offered on the on-screen ruler. They are Centimetres Inches Pixels Percent Picas To set the units, you must first bring up the Options Dialogue Box by right-clicking anywhere on the ruler and selecting the Options menu item or by using the Ctrl + O key combination. The units may be set using the radio-buttons in the Units group box. Click the unit you want to use, say "Inches". The units of the ruler should change to inches. Click OK to close the Options Dialogue Box. To set the units using the mouse wheel, simply rotate the wheel until the ruler displays the units you want. This is the fastest way to set the units, since you do not need to bring up the Options Dialogue box. Alternatively, use the F3 key to cycle through the units with each key press. On rare occasions, the pixels per inch reported by the OS is incorrect. In such cases, the Calibrate Tab allows you to adjust the pixels per inch value manually. The programme will remember the value the next time it starts. Use the arrow keys to manually change the markings on the ruler. Horizontal arrows are enabled when the ruler is horizontal and vertical arrows are enabled when the ruler is vertical. You may reset the pixels per inch setting at any time by clicking the reset button near the arrows. Notes: Since the percent and pixel units are not dependent on pixels per inch, calibration cannot be performed while these units are active. When using units of Centimetres and Picas, depending on the pixels per inch of your monitor, you may occasionally observe a rounding artefact. This is because conversion from inches to centimetres involves division by 2.54, which leads to ticks getting rounded down. The other units are not affected by this. 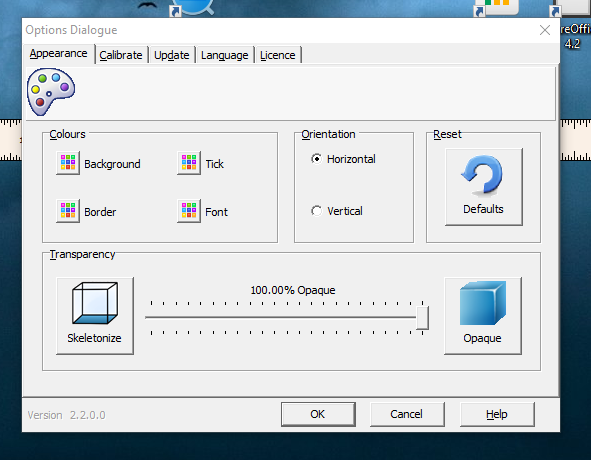 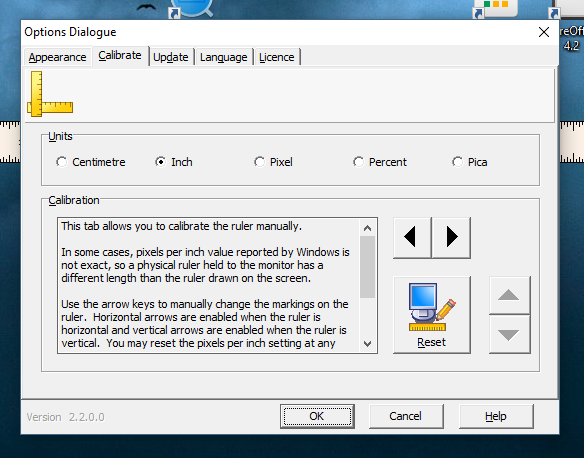 Click here to visit the author's website. Continue below for the main download link. |
||||||||
| Downloads | Views | Developer | Last Update | Version | Size | Type | Rank | |
| 4,653 | 8,523 | John Kummailil | Jun 02, 2022 - 11:12 | 2.4.0.167 | 718.6KB | ZIP |  , out of 65 Votes. , out of 65 Votes. |
|
| File Tags | ||||||||
| On-screen Ruler v2.4.0.167 | ||||||||
Click to Rate File Share it on Twitter → Tweet
|